Что такое stripe?
Stripe – это финансовый и программный сервис, который помогает разработчикам программного обеспечения и компаниям, занимающимся электронной коммерцией, осуществлять беспрепятственные платежи через свой API. Вы можете назвать Stripe компанией, предлагающей программное обеспечение как услугу (SaaS).
Поскольку финтех продолжает получать покровительство со стороны новых и существующих SaaS-компаний по всему миру, каждая третья платная услуга, выпущенная в Интернете, использует Stripe в качестве способа оплаты. Глубокое знание того, как интегрировать Stripe в ваше приложение React Native, будет лучшим способом уменьшить хлопоты, связанные с интеграцией платежей в ваши приложения для iOS и Android.
>= 0.60
Autolinking will just do the job.
Add-ons
Here’s a list of Payment Processors that you can enable via add-ons:
🚨Note: On Android, Payment Processors are enabled by default.
Android
npx jetify
Api spec
Down below we have a detailed specification for PaymentRequest and instructions for configuring Apple Pay and Google Pay, which is hopefully enough to get you started.
We also have some legacy example projects in the examples directory that will be rewritten soon and linked above.
Bear with us while we organize things a bit.
Apple pay payment type values
| Constant | Type | Value | Description |
|---|---|---|---|
| PaymentTypePending | int | 1 | A summary item representing an estimated or unknown cost. |
| PaymentTypeFinal | int | 2 | A summary item representing the known, final cost. |
Apple pay и другие способы оплаты
SDK поддерживает несколько вариантов оплаты, таких как банковские переводы, дебетование и переадресация; кредитные карты; купи сейчас, заплати потом; ваучеры; и цифровые кошельки. Он также поддерживает Apple Pay. Вы можете прочитать официальную документацию Stripe по интеграции Apple Pay здесь, а также о том, как интегрировать другие способы оплаты здесь.
Applepaycompletecallback
iOS Only
Callback invoked when the native iOS Apple Pay payment authorization sheet is closed with success, failure, or cancellation.
This callback notifies caller widget when it should switch to other views.
Applepayconfig
Represents the Apple Pay configuration.
Applepaynoncerequestfailurecallback
iOS Only
Callback invoked when a card nonce cannot be generated from Apple Pay payment authorization card input values.
Applepaynoncerequestsuccesscallback
iOS Only
Callback invoked when Apple Pay card details are available
This is called before the Apple Pay payment authorization sheet is closed. Call completeApplePayAuthorization
to close the apple pay sheet.
Brand
Supported brands for card payments accepted during the In-App Payments SDK checkout
flow.
VISA– Visa Inc. credit or debit card.MASTERCARD– Mastercard Incorporated credit or debit card.AMERICAN_EXPRESS– American Express Company credit card.DISCOVER– Discover Financial Services credit card.DISCOVER_DINERS– Diners Club International credit card.JCB– Japan Credit Bureau credit card.CHINA_UNION_PAY– China UnionPay credit card.OTHER_BRAND– An unexpected card type.
Building a card component
To begin, create a new folder named screens within the root directory of your React Native app.
Navigate into the folder and create a new file called paymentScreen.js, then paste in the code below:
Buyerverificationdetails
Represents the result of a successful buyer verification request.
Buyerverificationerrorcallback
Callback invoked when Buyer Verification flow fails.
Buyerverificationsuccesscallback
Callback invoked when Buyer Verification flow succeeds.
Canuseapplepay
iOS Only
Canusegooglepay
Android Only
Cardentrycancelcallback
Callback invoked when card entry canceled and has been closed.
Do not call completeCardEntry because the operation is complete and the card entry form is closed.
Cardentrycompletecallback
Callback invoked when card entry is completed and has been closed.
Cardentryconfig
Represents the Card Entry configuration.
Cardentrynoncerequestsuccesscallback
Callback invoked when card entry is returned successfully with card details.
Cardprepaidtype
The prepaid type of the credit card (for example, a Prepaid Gift Card). Note: This property is experimental and will always return UNKNOWN
PREPAID– Prepaid card.NOT_PREPAID– Card that is not prepaid.UNKNOWN– Unable to determine whether the card is prepaid or not.
Cardtype
The type of card (for example, Credit or Debit). Note: This property is experimental and will always return UNKNOWN.
DEBIT– Debit card.CREDIT– Credit card.UNKNOWN– Unable to determine type of the card.
Cocoapods
Link using Cocoapods by adding this to your Podfile:
Completeapplepayauthorization
iOS Only
Notifies the native layer to close the Apple Pay sheet with success or failure status.
| Parameter | Type | Description |
|---|---|---|
| isSuccess | bool | Indicates success or failure. |
| Optional: errorMessage | String | The error message that Apple Pay displays in the native layer card entry view controller. |
Completecardentry
Called in the onCardNonceRequestSuccess callback. Closes the card entry form.
completeCardEntry should be called after all other callback logic is executed.
If callback logic makes a server call to process the supplied nonce,
this method is called after getting a success response from the server.
If any nonce processing logic is to be executed after the card entry form is closed,
call completeCardEntry after getting the card nonce from the onCardNonceRequestSuccesscardDetails parameter.
Connect firebase to your firebase project
You can create a Firebase Project in Firebase console webpage, and invoke it in development environment (your system)
Once you have your project ready, connect it to your dev environment using
$ firebase init
then choosing the project, and choosing functions option from the choices.
With Firebase Functions, you can essentially right back-end (node.js) functions in same environment, test locally with firebase serve and can then deploy these to your Firebase project, so it can be connected to your app / website.
Once you have Firebase project connected, you will see a functions folder in your project root, as shown below
Contributors
Many people have contributed to the development of react-native-payments over time. The people below are currently available to help.
Create a firebase function to make payment requests
After this, you can create your back-end function in functions/index.js file. This function will accept a request object from your app / website, send the payment request to Stripe server, and return the response to your app / website again.
Remember to replace YOUR_SECRET_KEY with your own.
Notice that the payment request from your app should contain
This data should be sent in an object in POST API request, shown in next step.
Create paymentmethod with apple pay · issue #271 · stripe/stripe-react-native
Deploy firebase function to live site
Once your local testing is successful, deploy the firebase functions to live server using
$ firebase deploy --only functions
This will deploy the functions on your live Firebase server, which you can make API calls to. The url of the function will again be shown in the terminal after deployment, something like
Displaying the payment request
Now that you’ve setup your Payment Request, displaying it is as simple as calling the show method.
See Screenshots
Error
Contains information about a payment card processing error.
Example json
{
  "font": {
    "size": 30,
  },
  "backgroundColor" :{
    "r": 239,
    "g": 239,
    "b": 244,
    "a": 1.0,
  },
  "foregroundColor" :{
    "r": 255,
    "g": 255,
    "b": 255,
  },
  "textColor" :{
    "r": 0,
    "g": 0,
    "b": 0,
    "a": 0.9,
  },
  "placeholderTextColor" :{
    "r": 0.72,
    "g": 0.72,
    "b": 0.75,
    "a": 1.00,
  },
  "tintColor" :{
    "r": 0,
    "g": 122,
    "b": 254,
    "a": 1,
  },
  "messageColor" :{
    "r": 0.72,
    "g": 0.72,
    "b": 0.75,
    "a": 1.0,
  },
  "errorColor" :{
    "r": 139,
    "g": 0,
    "b": 12,
    "a": 0.9,
  },
  "saveButtonTitle": "Pay 💳 ",
  "saveButtonFont" : {
    "size": 30,
    "name": "courier",
  },
  "saveButtonTextColor": {
    "r": 213,
    "g": 133,
    "b": 12,
    "a": 0.9,
  },
  "keyboardAppearance": "Light",
}
Example usage
import{SQIPCardEntry}from'react-native-square-in-app-payments';constpaymentSourceId='ccof:customer-card-id-requires-verification';constcardEntryConfig={collectPostalCode: true,squareLocationId: SQUARE_LOCATION_ID,buyerAction: 'Charge',amount: 100,currencyCode: 'USD',givenName: 'John',familyName: 'Doe',addressLines: ['London Eye','Riverside Walk'],city: 'London',countryCode: 'GB',email: 'johndoe@example.com',phone: '8001234567',postalCode: 'SE1 7'};awaitSQIPCardEntry.startBuyerVerificationFlow(paymentSourceId,cardEntryConfig,(buyerVerificationDetails)=>{ ... },// onBuyerVerificationSuccess(errorInfo)=>{ ... },// onBuyerVerificationFailure()=>{ ... },// onCardEntryCancel);Generate token on app
To generate token, import the library in your page using
$ import stripe from 'tipsi-stripe'And initialize it with your Stripe credentials that you can get from dashboard.
stripe.setOptions({
publishableKey: 'PUBLISHABLE_KEY'
})
Remember, PUBLISHABLE_KEY only helps in generating token. Replace this with your own PUBLISHABLE_KEY
We will use the paymentRequestWithCardForm method of the library to get the Token (Check CardFormScreen.js file for full details)
The method will open the “Default card details form” for Stripe. Enter your card details here (or use a sample cards from Stripe), and enter your address and submit.
Once you submit the details, you will receive a token from Stripe. I have the token displayed in the UI like this, for confirmation
Gettotal(summaryitems)
Returns the total charge of the summary items.
Example
Google pay environment values
| Constant | Type | Value | Description |
|---|---|---|---|
| EnvironmentProduction | int | 1 | Environment to be used when an app is granted access to the Google Pay production environment. |
| EnvironmentTest | int | 3 | Environment to be used for development and testing an application before approval for production. |
Googlepaycancelcallback
Android Only
Callback invoked when Google Pay payment authorization is canceled.
Googlepayconfig
Represents the Google Pay configuration.
Googlepaynoncerequestfailurecallback
Android Only
Callback invoked a card nonce could not be obtained.
Googlepaynoncerequestsuccesscallback
Android Only
Callback invoked when cardDetails with Google Pay are available.
How does stripe work ?
To simplify the understanding, let us understand the complete flow pictorially
Essentially, in front-end (App side) we initiate a payment. This requests for a token from Stripe server. Once this token is received on front-end, you need to send it to your server (back-end). Only your server can communicate to Stripe server for actual payment.
In progress
- Stripe: Payment Intents (for SCA)
Inapppaymentsexception
Signals that card entry exception of some sort has occurred. This
class is the general class of exceptions produced by failed payment card
processing operations.
Install
npm i --save react-native-apple-payIostheme
Encapsulates options used to style the iOS native card entry view controller.
| Field | Type | Description |
|---|---|---|
| Optional: font | Font | The text field font. |
| Optional: backgroundColor | RGBAColor | The background color of the card entry view controller. |
| Optional: foregroundColor | RGBAColor | The fill color for text fields. |
| Optional: textColor | RGBAColor | The text field text color. |
| Optional: placeholderTextColor | RGBAColor | The text field placeholder text color. |
| Optional: tintColor | RGBAColor | The tint color reflected in the text field cursor and submit button background color when enabled. |
| Optional: messageColor | RGBAColor | The text color used to display informational messages. |
| Optional: errorColor | RGBAColor | The text color when the text is invalid. |
| Optional: saveButtonTitle | String | The text of the entry completion button |
| Optional: saveButtonFont | Font | The save button font. |
| Optional: saveButtonTextColor | RGBAColor | The save button text color when enabled. |
| Optional: keyboardAppearance | KeyboardAppearance | The appearance of the keyboard. |
Join us!
All contributions, big or small are welcomed.
For large PRs, please open an issue and have a discussion with us first before you dive in.
Our plan for this library is for it to be useful to all React Native developers so we want to architect it carefully.
License
Copyright (c) 2022, Naoufal Kadhom, Igor Shmukler
Permission to use, copy, modify, and/or distribute this software for any purpose with or without fee is hereby granted, provided that the above copyright notice and this permission notice appear in all copies.
THE SOFTWARE IS PROVIDED “AS IS” AND THE AUTHOR DISCLAIMS ALL WARRANTIES WITH REGARD TO THIS SOFTWARE INCLUDING ALL IMPLIED WARRANTIES OF MERCHANTABILITY AND FITNESS. IN NO EVENT SHALL THE AUTHOR BE LIABLE FOR ANY SPECIAL, DIRECT, INDIRECT, OR CONSEQUENTIAL DAMAGES OR ANY DAMAGES WHATSOEVER RESULTING FROM LOSS OF USE, DATA OR PROFITS, WHETHER IN AN ACTION OF CONTRACT, NEGLIGENCE OR OTHER TORTIOUS ACTION, ARISING OUT OF OR IN CONNECTION WITH THE USE OR PERFORMANCE OF THIS SOFTWARE.
Link the package
Run react-native link tipsi-stripe to link the package against your Xcode project and so that all CocoaPods dependencies are installed.
Note: Linking on Windows system currently isn’t working, sadly. Check here for updates
Live demo
For a step by step guide, check out this talk by @naoufal.
Paymentrequest(merchantoptions, paymentitems)
Initializes Apple Pay. NOTE that paymentRequest adds one entry to the paymentItems array – summary, where label is set to merchantName and amount is sum of all amount values in the original array.
Arguments
merchantOptions– AnObjectthat will be served to setup the payment request.summaryItems– AnArraycontaining the items the customer will be purchasing.
merchantOptions
summaryItem
label– AStringrepresenting the summary name.amount– ANumberwith two decimal places representing the summary price.
Example
varmerchantOptions={paymentProcessor: 'stripe',paymentProcessorPublicKey: 'pk_test_QsubAYNpjqwertyAogowi9r7',merchantIdentifier: 'merchant.yourapp.you',merchantName: "Company, Inc.",supportedNetworks: ['PKPaymentNetworkMasterCard','PKPaymentNetworkVisa'],merchantCapabilities: ['PKMerchantCapability3DS','PKMerchantCapabilityEMV'],countryCode: 'US',currencyCode: 'USD'};varsummaryItems=[{label: 'Hockey Stick',amount: 88.88}];ApplePay.paymentRequest(merchantOptions,summaryItems).then(chargeTokenOnServer).then(ApplePay.success).catch(error=>{// Log errorApplePay.failure();});functionchargeTokenOnServer(token){...}Processing payments on your server
If you’re equipped to process Apple Pay/Android Pay payments on your server, all you have to do is send the Payment Response data to your server.
⚠️ Note: When running Apple Pay on simulator, paymentData equals to null.
import { NativeModules } from 'react-native';

paymentRequest.show()
  .then(paymentResponse => {
    const { transactionIdentifier, paymentData } = paymentResponse.details;

    return fetch('...', {
      method: 'POST',
      body: {
        transactionIdentifier,
        paymentData
      }
    })
    .then(res => res.json())
    .then(successHandler)
    .catch(errorHandler)
  });
See Android Pay Example
paymentRequest.show()
  .then(paymentResponse => {
    const { getPaymentToken } = paymentResponse.details;

    return getPaymentToken()
      .then(paymentToken => {
        const { ephemeralPublicKey, encryptedMessage, tag } = paymentResponse.details;

        return fetch('...', {
          method: 'POST',
          body: {
            ephemeralPublicKey,
            encryptedMessage,
            tag
          }
        })
        .then(res => res.json())
        .then(successHandler)
        .catch(errorHandler)
      });
  });
You can learn more about server-side decrypting of Payment Tokens on Apple’s Payment Token Format Reference documentation.
Processing payments with a payment processor
When using a payment processor, you’ll receive a paymentToken field within the details of the PaymentResponse. Use this token to charge customers with your payment processor.
paymentRequest.show()
  .then(paymentResponse => {
    const { paymentToken } = paymentResponse.details; // On Android, you need to invoke the `getPaymentToken` method to receive the `paymentToken`.

    return fetch('...', {
      method: 'POST',
      body: {
        paymentToken
      }
    })
    .then(res => res.json())
    .then(successHandler)
    .catch(errorHandler);
  });
See Android Pay Example
paymentRequest.show()
  .then(paymentResponse => {
    const { getPaymentToken } = paymentResponse.details;

    return getPaymentToken()
      .then(paymentToken => fetch('...', {
        method: 'POST',
        body: {
          paymentToken
        }
      })
      .then(res => res.json())
      .then(successHandler)
      .catch(errorHandler);
    });
  });
For a list of supported payment processors and how to enable them, see the Add-ons section.
React native and stripe
React Native can create a wide variety of apps, and hence a wide variety of payment gateways can be implemented in React Native apps. The popular ones are PayPal, Stripe, RazorPay, Braintree, in-app purchase etc.
There are two options for front-end implementation of Stripe in React Native apps
- Use the iOS / Android SDKs provided by Stripe
- Use a 3rd party library for React Native:
tipsi-stripe
There are pros and cons to each path, mainly revolving around the fact that the React Native library from Tipsi has not been “publicly” approved by Stripe. If you want maximum compliance in production environment, go for Stripe’s fully vetted SDKs.
React native payments
Accept Payments with Apple Pay and Android Pay using the Payment Request API.
Features
- Simple. No more checkout forms.
- Effective. Faster checkouts that increase conversion.
- Future-proof. Use a W3C Standards API, supported by companies like Google, Firefox and others.
- Cross-platform. Share payments code between your iOS, Android, and web apps.
- Add-ons. Easily enable support for Stripe or Braintree via add-ons.
Requestapplepaynonce
iOS Only
Starts the Apple Pay payment authorization and returns a nonce based on the authorized Apple Pay payment token.
Throws InAppPaymentsException
Requestgooglepaynonce
Android Only
Starts the Google Pay payment authorization and returns a nonce based on the authorized Google Pay payment token.
Throws InAppPaymentsException
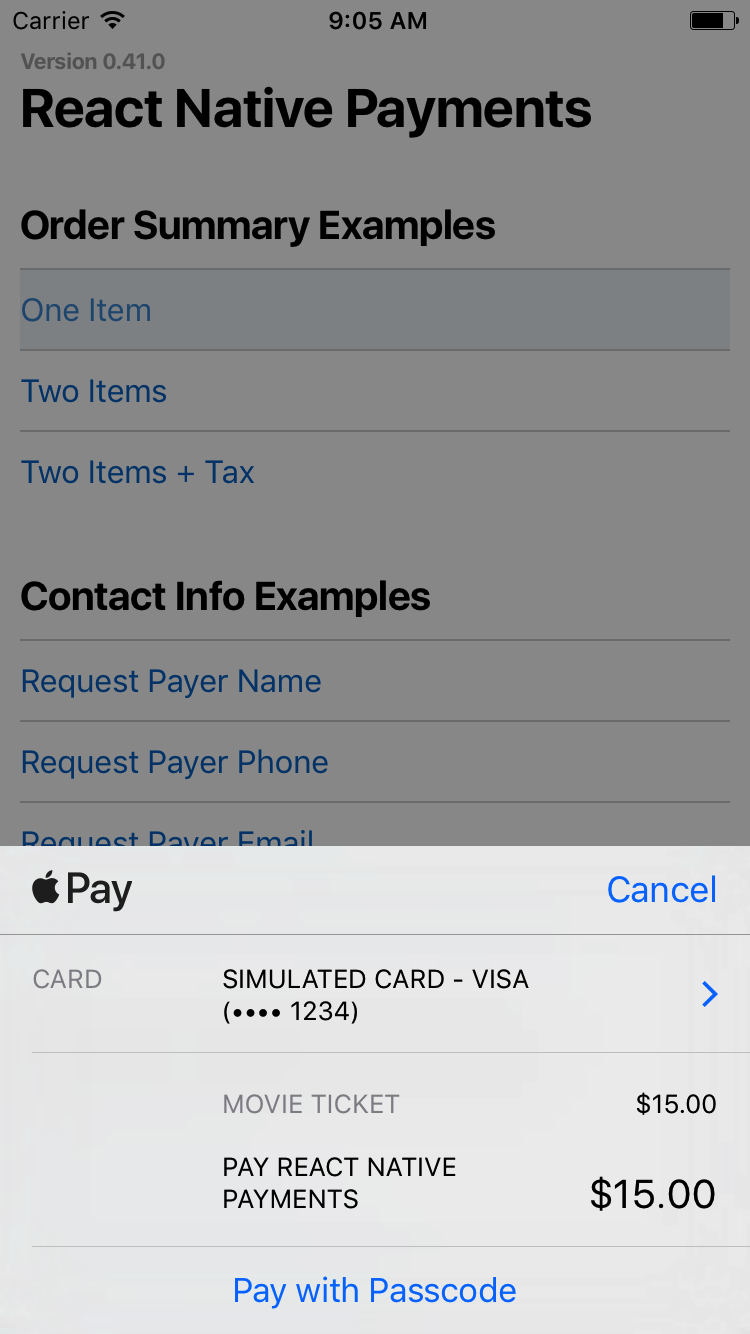
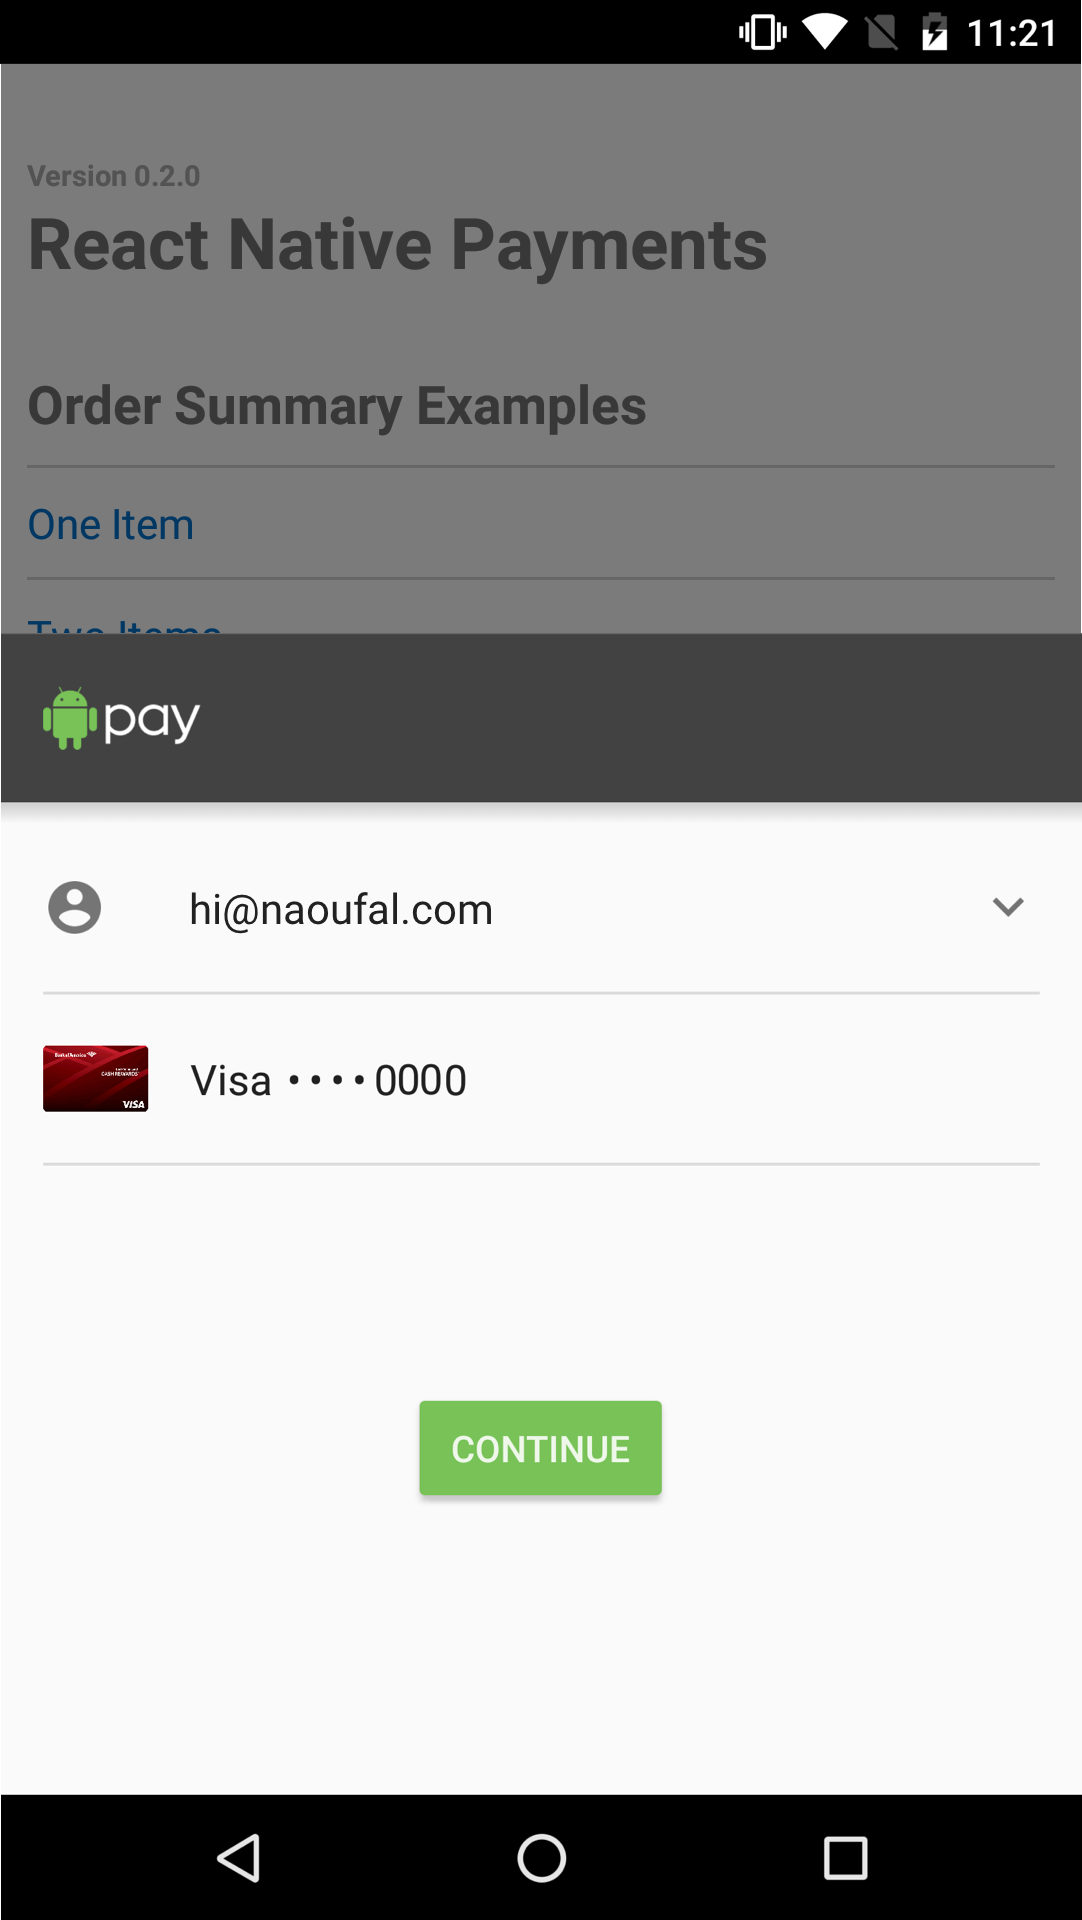
Requesting a contact name
Set requestPayerName to true to request a contact name.
See Screenshots

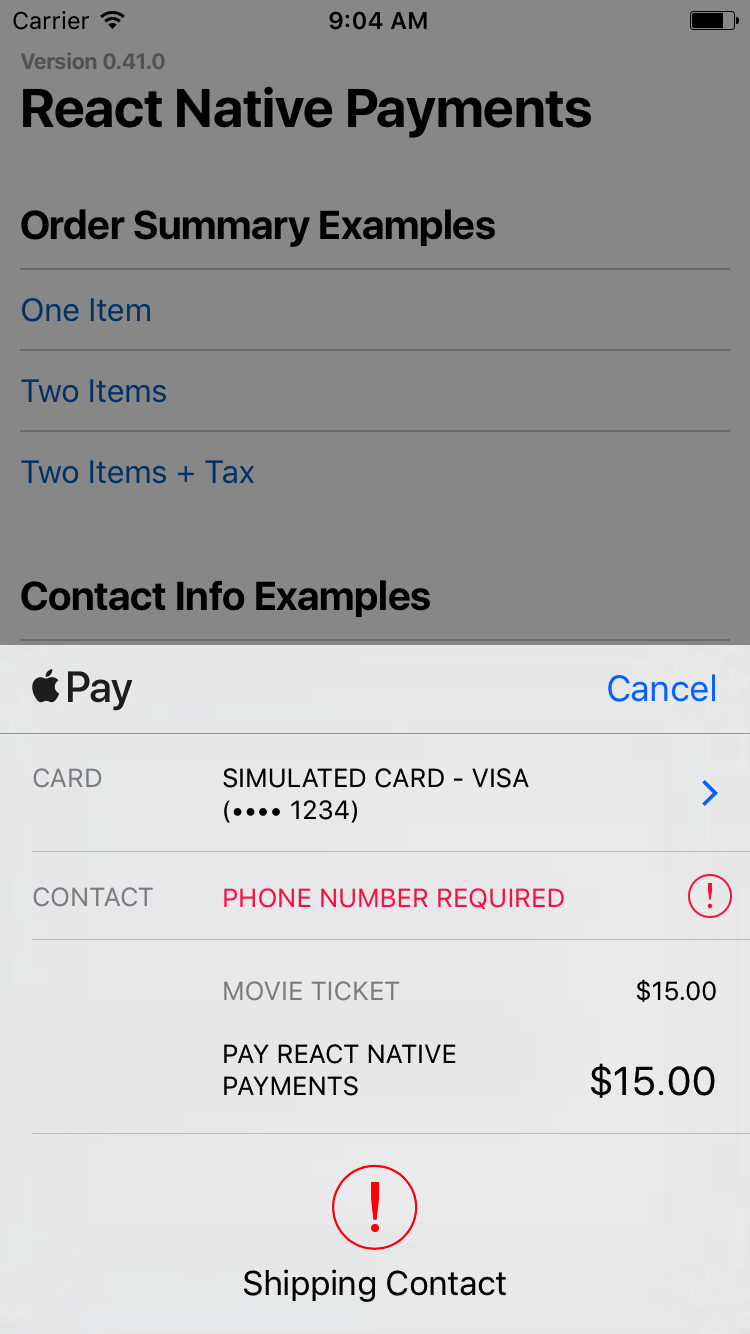
Requesting a phone number
Set requestPayerPhone to true to request a phone number.
See Screenshots
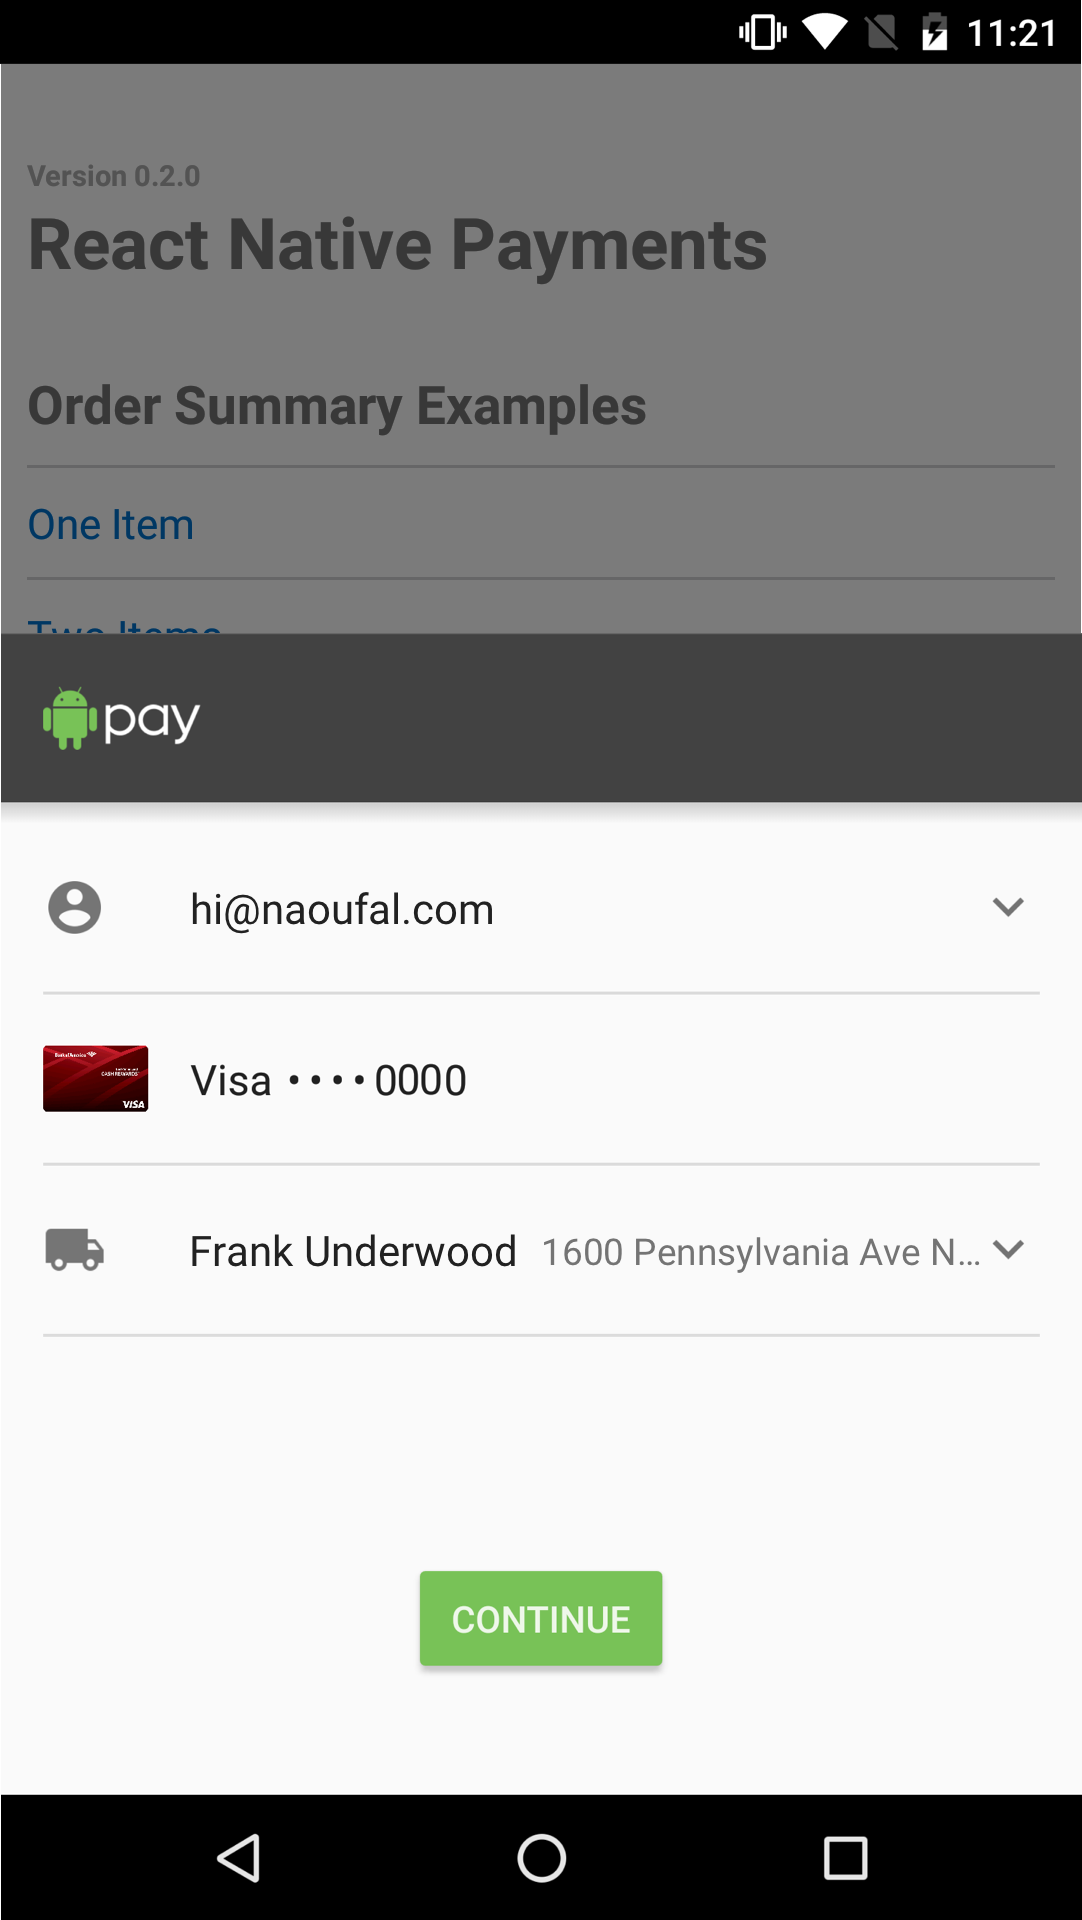
Requesting a shipping address
Requesting a shipping address is done in three steps.
First, you’ll need to set requestShipping to true within PaymentOptions.
Second, you’ll need to include shippingOptions in your Payment Details.
const DETAILS = {
  id: 'basic-example',
  displayItems: [
    {
      label: 'Movie Ticket',
      amount: { currency: 'USD', value: '15.00' }
    }
  ],
  shippingOptions: [{    id: 'economy',    label: 'Economy Shipping',    amount: { currency: 'USD', value: '0.00' },    detail: 'Arrives in 3-5 days' // `detail` is specific to React Native Payments  }],
  total: {
    label: 'Merchant Name',
    amount: { currency: 'USD', value: '15.00' }
  }
};
Requesting an email address
Set requestPayerEmail to true to request an email address.
See Screenshots

You can also request all three by setting them all to true.
Sca-ready
The SDK by default performs a 3D authentication in compliance with Strong Customer Authentication offered by Stripe. Read more about card authentication and 3D secure in Stripe here.
Sdk stripe react native
Теперь, когда вы понимаете, что такое Stripe, лучший способ начать работу с Stripe API – это прочитать официальную документацию Stripe здесь.
Но знаете что? SDK Stripe React Native может сократить этот процесс примерно на 60%.
Давайте изучим Stripe React Native SDK и посмотрим, что он может предложить. Ниже приведен список функций, поставляемых с выпуском v0.1.2.
Setsquareapplicationid
Used to set a Square Application ID on the InAppPaymentsSDK object.
Setup
npm install

cd ios
pod install


npm run ios
Setup firebase cloud function
Assumption — You already know how to create a Firebase Project, and deploy Firebase function on it. You can follow my blogs on how to create a Firebase project (first few steps) and how to create Firebase Cloud functions.
To interact with Firebase functions in development, you need Firebase-tools in your system. Install firebase tools with
$ npm install -g firebase-toolsSetup pods
To integrate appropriate pods for iOS app, setup your Podfile like the following then run pod install. My Podfile looks like this
Setup xcode project
- Open your project in Xcode workspace.
- Drag the following folder into your project:
Showcardnonceprocessingerror
Called in the onCardNonceRequestSuccess callback. Returns execution to the card entry form
with an error string to be shown in the form.
showCardNonceProcessingError should be called after all other callback logic is executed.
If callback logic makes a server call to request a payment with the supplied nonce,
this method is called after getting an error response from the server call.
| Parameter | Type | Description |
|---|---|---|
| errorMessage | String | The error message to be shown in the card entry form. |
Startcardentryflowwithbuyerverification
Displays a full-screen card entry view with buyer verification flow enabled. The method takes one configuration object and three call back parameters which correspond
to the possible results of the request.
Step 2— create a basic react native app
First, make sure you have all pre-requisites to create a react-native app as per the official documentation.
At the time of this post, I have React-Native version 0.60
Create a blank react-native app (Replace RNStripe with your own app name)
$ react-native init RNStripeThis will create a basic React-native app which you can run in a device or simulator. Let’s run the app in iOS using
$ react-native run-ios
You’ll see the default start screen on device / simulator. For sample purpose, I will be using the UI provided by tipsi-stripe library. It has options for all kinds of payments — including Apple Pay, Google Pay etc. I’ll be using the default card payment form for this post’s purpose
There are three major files used for this example
You can find these files in the Github repo attached to this post.
Step 3 — integrate stripe library tipsi-stripe for token generation
To include Stripe functionality in your React Native app, you need to install tipsi-stripe package. Install the package with following commands
$ npm install --save tipsi-stripeSteps to implement
I will break it down into steps to keep the post organized
Step 1 — Stripe Developer account and API keys
Step 2 — Create a basic React Native app for Stripe integration
Step 3— Integrate Stripe library tipsi-stripe for token generation
Step 4— Create Firebase function (or any back-end function to accept API calls) to accept tokens from app, and make payment requests to Stripe server
Step 5— Connect app to our Firebase server. Complete Stripe payment requests from Firebase server.
Let’s start step-by-step
Complete source code of this tutorial is available in the RNStripe Github repository
Test firebase functions locally
To test whether your Firebase function is correctly written, run the function locally by running command
$ firebase serve
This will start your firebase local server, and the url will be displayed in the terminal , something like
Usage
import{ApplePay}from'react-native-apay';constrequestData={merchantIdentifier: 'merchant.com.example',supportedNetworks: ['mastercard','visa'],countryCode: 'US',currencyCode: 'USD',paymentSummaryItems: [{label: 'Item label',amount: '100.00',},],}// Check if ApplePay is availableif(ApplePay.canMakePayments){ApplePay.requestPayment(requestData).then((paymentData)=>{console.log(paymentData);// Simulate a request to the gatewaysetTimeout(()=>{// Show status to user ApplePay.SUCCESS || ApplePay.FAILUREApplePay.complete(ApplePay.SUCCESS).then(()=>{console.log('completed');// do something});},1000);});};What is react-native ?
TLDR; — React Native (RN) creates cross-platform apps, more “native” than web-view apps made by Cordova / Ionic. But React Native is yet to release a stable (1.0.0_) version of the framework.
Безопасность
Stripe React Native SDK помогает собирать конфиденциальные данные, такие как номера кредитных карт, и безопасно принимать платежи, отправляя данные в API Stripe вместо того, чтобы передавать их через внутренний сервер.
Встроенный платежный интерфейс (бета)
SDK поддерживает встроенные платежные интерфейсы, предлагаемые Stripe. Эта функция находится в стадии бета-тестирования с поддержкой Apple Pay, Google Pay и пользовательских интерфейсов для оплаты картой. Тем не менее, в будущем планируется создать поддержку для большего количества вариантов оплаты. Вы можете прочитать об интерфейсах оплаты Stripe здесь.
В этих руководствах мы исследуем некоторые из перечисленных выше функций, создав и протестировав экран оплаты в нашем приложении React Native. Приступим к следующему разделу.
Готовый пользовательский интерфейс (пошаговый)
Эта функция представляет собой комбинацию всех шагов, связанных с принятием оплаты в Stripe с использованием данных кредитной карты. Для этой интеграции требуется конечная точка, которая взаимодействует с Stripe API с вашего сервера.
Настройка учетной записи stripe
Для каждого SDK требуются персональные ключи доступа, и Stripe не является исключением. Чтобы продолжить это руководство по React Native, мы должны создать учетную запись Stripe и получить наши личные ключи, чтобы принимать оплату.
Приложение react native stripe
Теперь, когда вы создали свою учетную запись Stripe и получили свой открытый ключ, давайте инициализируем новое приложение React Native и установим Stripe React Native SDK.
Перейдите в каталог разработки и вставьте команду ниже, чтобы установить новое приложение React Native:
После завершения установки перейдите в StripeReactNative через терминал и вставьте приведенный ниже код, чтобы установить пакет SDK Stripe React Native в ваше приложение:
SDK Stripe React Native имеет некоторые требования для поддержки Android и iOS. Вы можете сослаться на них здесь:
Android
- Android 5.0 (уровень API 21) и выше
- Плагин Android Gradle 4.x и выше
iOS
- Совместимость с приложениями, ориентированными на iOS 11 или выше.
Собственный интерфейс
SDK Stripe React Native поставляется с собственными экранами и элементами для безопасного приема платежей в Android и iOS.
Создание компонента карты
Для начала создайте новую папку с именем screens в корневом каталоге вашего приложения React Native.
Перейдите в папку и создайте новый файл с именем paymentScreen.js, затем вставьте код ниже:
import React, {useState} from "react";
import {
    CardField,
    CardFieldInput,
    useStripe,
  } from '@stripe/stripe-react-native';

  export default PaymentScreen = () => {
    const [card, setCard] = useState(CardFieldInput.Details | null);
    const {confirmPayment, handleCardAction} = useStripe()
    return(
        <CardField
      postalCodeEnabled={true}
      placeholder={{
        number: '4242 4242 4242 4242',
      }}
      cardStyle={{
        backgroundColor: '#FFFFFF',
        textColor: '#000000',
      }}
      style={{
        width: '100%',
        height: 50,
        marginVertical: 30,
      }}
      onCardChange={(cardDetails) => {
        setCard(cardDetails);
      }}
      onFocus={(focusedField) => {
        console.log('focusField', focusedField);
      }}
    />
    )
  }
Затем давайте импортируем paymentScreen.js в корень нашего проекта.
Откройте App.js и обновите его код, чтобы он выглядел так, как показано ниже:
Давайте запустим наше приложение, чтобы протестировать то, что мы создали. Запустите npx react-native run-ios, чтобы запустить сборку для iOS.
Скорее всего, вы столкнетесь с ошибкой undefined symbols for architecture x86_64, но не паникуйте! Чтобы исправить ошибку, выполните следующие действия:
Откройте свой проект Xcode и создайте новый файл Swift (File > New > File > Swift). Назовите файл как угодно (например, Fix.swift) и выберите создать заголовок моста, при появлении запроса от Xcode.
Запустите npx react-native run-iosеще раз, и ошибка должна быть исправлена. В случае успеха ваше приложение после загрузки должно выглядеть, как на скриншоте ниже:
Мы только что создали простой компонент карты, который отправляет данные карты непосредственно на сервер Stripe для проверки в реальном времени и впоследствии сохраняет состояние компонента.
Создание конечной точки
Чтобы настроить сервер для связи с Stripe из React Native, нам нужно инициализировать новое приложение node.js с install express body-parser и dotenv.
Создайте новую папку с именем server, перейдите в папку, запустите npm init -y и следуйте инструкциям, чтобы создать новое приложение Node. Затем запустите npm i express body-parser dotenv
Наконец, создайте файл server.js на корневом уровне папки сервера и вставьте в файл приведенный ниже код:
require("dotenv").config();
const express = require("express");
const app = express();
const { resolve } = require("path");
const stripe = require("stripe")(process.env.secret_key); // https://stripe.com/docs/keys#obtain-api-keys
app.use(express.static("."));
app.use(express.json());
// An endpoint for your checkout
app.post("/checkout", async (req, res) => {
  // Create or retrieve the Stripe Customer object associated with your user.
  let customer = await stripe.customers.create(); // This example just creates a new Customer every time

  // Create an ephemeral key for the Customer; this allows the app to display saved payment methods and save new ones
  const ephemeralKey = await stripe.ephemeralKeys.create(
    {customer: customer.id},
    {apiVersion: '2020-08-27'}
  );

  // Create a PaymentIntent with the payment amount, currency, and customer
  const paymentIntent = await stripe.paymentIntents.create({
    amount: 973,
    currency: "usd",
    customer: customer.id
  });

  // Send the object keys to the client
  res.send({
    publishableKey: process.env.publishable_key, // https://stripe.com/docs/keys#obtain-api-keys
    paymentIntent: paymentIntent.client_secret,
    customer: customer.id,
    ephemeralKey: ephemeralKey.secret
  });
});

app.listen(process.env.PORT, () =>
  console.log(`Node server listening on port ${process.env.PORT}!`)
);
Не забудьте создать файл .env с кодом ниже:
Затем обновите paymentScreen.js с помощью кода ниже, чтобы добавить кнопку оформления заказа в приложение:
import React, { useState, useEffect } from "react";
import { StyleSheet, Button, View} from 'react-native';
import {
  CardField,
  CardFieldInput,
  useStripe,
} from '@stripe/stripe-react-native';

export default PaymentScreen = () => {
  const [card, setCard] = useState(CardFieldInput.Details | null);
  const { confirmPayment, handleCardAction } = useStripe()
  const API_URL = "http://localhost:8000";
  const { initPaymentSheet, presentPaymentSheet } = useStripe();
  const [loading, setLoading] = useState(false);

  const fetchPaymentSheetParams = async () => {
    const response = await fetch(`${API_URL}/checkout`, {
      method: 'POST',
      headers: {
        'Content-Type': 'application/json',
      },
    });
    const { paymentIntent, ephemeralKey, customer } = await response.json();
    return {
      paymentIntent,
      ephemeralKey,
      customer,
    };
  };
  const initializePaymentSheet = async () => {
    const {
      paymentIntent,
      ephemeralKey,
      customer,
    } = await fetchPaymentSheetParams();
    const { error } = await initPaymentSheet({
      customerId: customer,
      customerEphemeralKeySecret: ephemeralKey,
      paymentIntentClientSecret: paymentIntent,
    });
    if (!error) {
      setLoading(true);
    }
  };
  const openPaymentSheet = async () => {
    const { error } = await presentPaymentSheet({ clientSecret });
    if (error) {
      Alert.alert(`Error code: ${error.code}`, error.message);
    } else {
      Alert.alert('Success', 'Your order is confirmed!');
    }
  };
  useEffect(() => {
    initializePaymentSheet();
  }, []);
  return (
    <View style={styles.container}>
      <CardField
        postalCodeEnabled={false}
        placeholder={{
          number: '4242 4242 4242 4242',
        }}
        cardStyle={{
          backgroundColor: '#FFFFFF',
          textColor: '#000000',
        }}
        style={{
          width: '100%',
          height: 50,
          marginVertical: 30,
        }}
        onCardChange={(cardDetails) => {
          setCard(cardDetails);
        }}
        onFocus={(focusedField) => {
          console.log('focusField', focusedField);
        }}
      />
        <Button
          style={styles.button}
          disabled={!loading}
          title="Checkout"
          color="#841584"
          onPress={openPaymentSheet}
        />
        </View>
  )
}
const styles = StyleSheet.create({
  container: {
     flex: 1,
     padding: 20,
     marginHorizontal: 10,
     marginVertical: 10,
  },
  button: {
     backgroundColor: '#00aeef',
     borderColor: 'red',
     borderWidth: 5,
     borderRadius: 15
  }
})
Как видно выше, создайте отдельный проект node.js и настройте сервер с портом 8000. Из React Native отправьте запрос в конечную точку /checkout на сервере. Как только запрос будет выполнен успешно, initializePaymentSheet будет вызван с помощью хука useEffect.
Во время этого процесса кнопка остается неактивной до тех пор, пока не будет получен ответ от серверной части. Обратите внимание, что ваш бэкэнд-сервер должен быть запущен и работать до тех пор, пока вы намереваетесь обмениваться данными с ним.
На этом этапе ваше приложение должно выглядеть примерно так, как показано на скриншоте ниже:
Создание платежного экрана
Теперь, когда SDK успешно установлен, приступим к созданию нашего первого экрана оплаты.
Установка с ios
Установить Stripe React Native SDK в iOS немного сложнее, чем в Android.
Чтобы избежать ошибок после установки пакета через npm, откройте StripeReactNative.xcworkspace в XCode и установите цель развертывания на iOS 11.0. Пример см. на скриншоте ниже:
Запустите свой проект из Xcode, чтобы убедиться, что все изменения применены, затем перейдите в папку iOS. Откройте podfile, обновите platform :ios, ‘10.0’ до platform :ios, ’11.
Далее, давайте избавимся от стандартного собственного кода React из App.js. Обновите файл App.js с кодом ниже:
Если вы запустите приложение, вы должны увидеть пустой экран, аналогичный показанному ниже:
Initializegooglepay
Android Only
Optional: Used to enable Google Pay in an Android app. Initialize React Native plugin for google pay.
This is a method called only once when React Native app is being initialized on an Android device.
Заключение
Stripe React Native SDK от Stripe очень легко реализовать. Благодаря поддержке готовых пользовательских интерфейсов (включая планы по будущей поддержке большего количества готовых пользовательских интерфейсов) и вариантам оплаты, он становится фаворитом разработчиков.
Conclusion
In this blog we learnt how to implement Stripe Payment in a React Native app. I know it is a long post with a lot to understand. Let me repeat the gist of the post —
Stripe payment consists of two parts — front-end (tokenization) and back-end (actual payment request). The Stripe payment integration will follow this pictorial flow
Complete source code of this tutorial is available in the RNStripe Github repository.
Stay tuned for more React Native blogs !
Step 2: initialize apple pay and verify apple pay support
Add code to initialize Apple Pay in your application State class.
- Replace
REPLACE_WITH_APPLE_PAY_MERCHANT_IDin this example with a valid apple pay merchant ID.
Initializeapplepay
iOS Only
Initializes the In-App Payments React Native plugin for Apple Pay.
This is a method called only once when React Native app is being initialized on an iOS device.
Call this method only on an iOS device and when your app is intended to support Apple Pay.
| Parameter | Type | Description |
|---|---|---|
| applePayMerchantId | String | Registered Apple Pay merchant ID |
Initializing the payment request
To initialize a Payment Request, you’ll need to provide PaymentMethodData and PaymentDetails.
Is your feature request related to a problem? Please describe.
When creating a subscription for a customer with a debit card, it is clear and straightforward that the payment method is stored with the subscription and associated with the customer object. You can either create a PaymentMethod using the card information and associate it with the subscription in that manner, or you can pass in
setupFutureUsage: 'OffSession'toconfirmPayment()to associate the card information.When paying with Apple Pay, it is not clear that the Apple Pay payment method is being associated with the subscription. I create a subscription on the server side and pass in
payment_behavior: "default_incomplete", and then callconfirmApplePayPayment()on the frontend. Do I just trust that the payment method will be associated and charged again when the customer’s subscription auto-renews?Describe the solution you’d like
Allow us to create Apple Pay tokens and create PaymentMethods with them, as noted by Stripe documentation here:
https://support.stripe.com/questions/using-apple-pay-for-recurring-payments
Or add a
setupFutureUsagefield to theconfirmApplePayPayment()so that we can be sure that the customer’s payment method is associated with their subscription.Describe alternatives you’ve considered
Use
confirmApplePayPayment()with a payment_intent secret from the server-side subscription object and hope that the payment associates itself.Additional context
My main concern here is with changing payment methods on the customer’s subscription if the customer has a subscription with no PaymentMethod attached to their customer object. What would happen if we called (server-side)
for an Apple Pay payment whose payment_intent never gets confirmed on the frontend? In my mind, if this happened with a debit card payment, at least the associated PaymentMethod attached to the customer object would be a fallback method for payment, but would this wipe the Apple Pay payment method off of the subscription object?